Replacing an H2/H3 DSP Module
27 Nov 2024
Description
The HarvestMaster H2/H3 DSP modules contain factory calibration coefficients that need to be loaded to the new module when one is replaced. The coefficients relate to the H2/H3 chassis and load cells. If a DSP module is replaced but the chassis calibration is not loaded to it, the system will still work, but plot weight accuracy will be reduced. Thus it is important to get the proper chassis calibration loaded.
For this process to work properly, you must be using Mirus version 3.2 or newer. When replacing the module with a newly (RESET) module, Mirus is designed to automatically detect the new module and push the stored coefficients, which it has stored previously from the last successful connection, to the new DSP module. The calibrations, acuator settings, module coeficitents, and chassis coeficients should all be restored normally to the newly replaced module.
IMPORTANT: The tablet used to connect to the new (or freshly RESET) DSP module MUST be the one that was recently connected successfully to the original DSP module (i.e. the one being replaced). All new modules coming from the factory should have these values reset; however, it is good practice to check anytime you replace a DSP module. Remember, when you install a new DSP module and restart Mirus, these values get changed to "non-default." Thus, it is important that you DO NOT swap DSP modules, from one H2/H3 to another H2/H3, without first resetting the DSP to default.
How to RESET a DSP Module
1. Ensure the module you want RESET has power and is connected to the CAN buss. No other sensors need to be plugged in at this time.
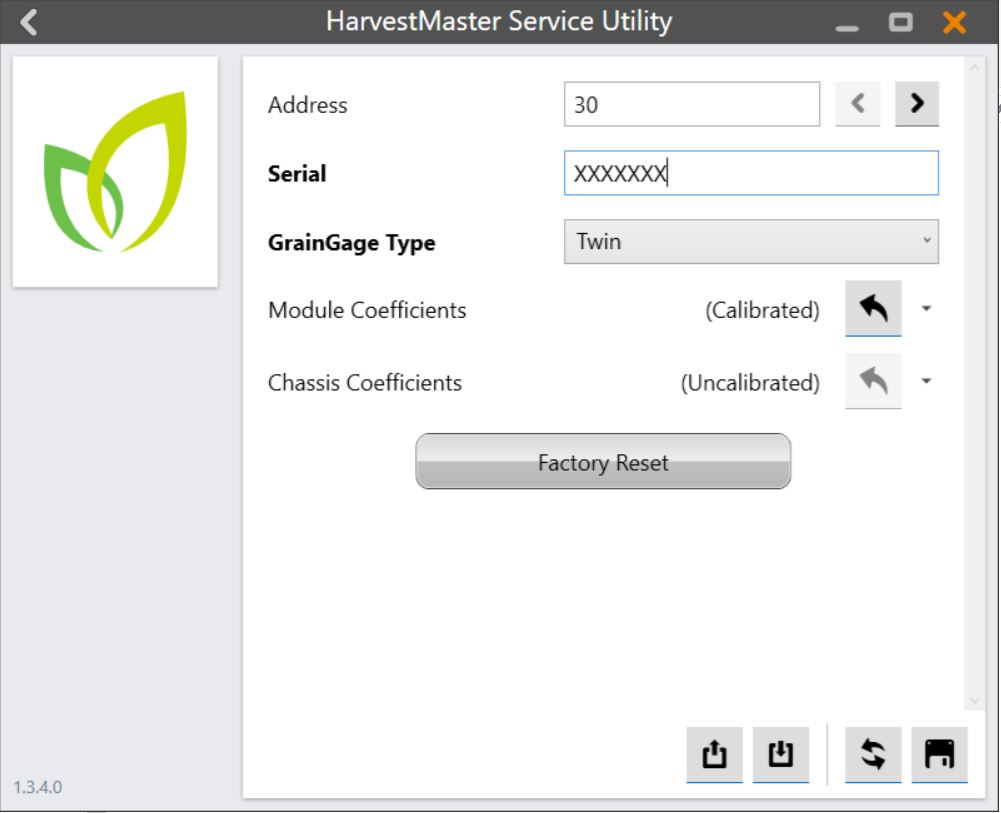
2. Run the service utility version 1.3.4.0 or later. When using Mirus version 4.6 or later, there may be two versions located at: C:\HarvestMaster\Mirus\Devices\H-SeriesGG\Tools. Either one will work okay. When using Mirus 4.5 and earlier, this same service utility will be located at: C:\HarvestMaster\Mirus\Devices\HM800\Tools.
3. Click on the connected DSP module "Analog/DSP <Serial Number>" you want to RESET.
4. Click on the backup settings icon (left most icon in the lower right corner of the window) and save the settings to a secure location on your hard drive. Label the folder so you remember what system these settings are from. This step is for precaution only. These settings can be restored to any DSP module using the "restore" icon (next to the backup icon).
WARNING: DO NOT reset the "Module Coefficients." These are coefficients that are
specific to that module and if reset, they will need to entered by hand.
5. To the right of the label "Chassis Coefficients," click on the arrow pointing to the left and make sure the coefficients are reset to "(Uncalibrated)."
6. Click the button "Factory Reset" and make sure the "Chassis Coefficients" have been reset to "(Uncalibrated)." Module coefficients should still say "Calibrated")
7. Change the "GrainGage Type" to the type of GrainGage system you will be installing this DSP and save the settings by pressing the disk icon in the lower right corner of the window.
8. Using the tablet that contains the old DSP module configuration settings, connect to the newly installed DSP module after running Mirus.
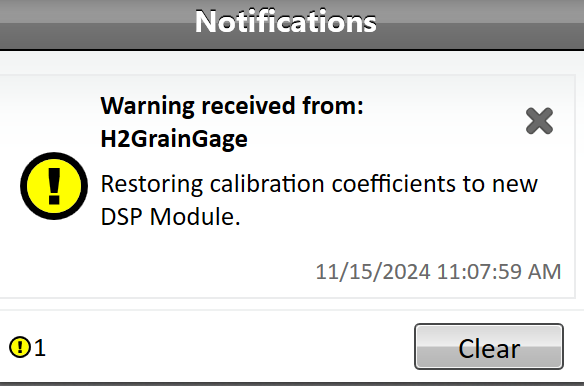
9. A yellow warning notification window should slide out from the left side of the screen indicating that Mirus is "Restoring calibration coefficients to new DSP Module."
10. Double check system calibration and acuator timers/settings to ensure all settings are restored properly. If you run into any issues, try restoring the backup that you saved in step#4. These settings can be restored using the "restore" icon (to the right of the backup icon).
11. Check weight and moisture calibrations to ensure accuracy.
If you run into any issues, contact one of our HarvestMaster Field Service Engineers. For contact information, see Contact a HarvestMaster Field Service Engineer.
- Phone Number: 435-753-1881
- Email: hmtechsupport@junipersys.com
- Address: 1132 W 1700 N, Logan, UT 84321


