How to Perform an M2.0 Moisture Calibration
For more information, see the Mirus for H2 GrainGage User's Manual.
Prepare for Calibration [:25]
- Do a slope and motion calibration.
- Do both a plot weight and test weight load cell calibration.
- You’ll need a minimum of two samples with known moisture:
- One sample (closest to the industry moisture standard) with a known test weight.
- The more samples you have, the better.
- You’ll need at least a 3% range from lowest moisture to highest moisture.
- The more samples within about a 10% range the better, but 2 or 3 samples will suffice.
- Each sample should weigh at least 6 lb.
- Samples need to be at ambient temperature.
- Samples need to have natural moisture content. Do not re-wet samples.
Perform the Calibration
-
Connect to the H2 GrainGage [1:08]
-
Tap Setup > H2 GrainGage > Moisture Curves.
-
Tap the plus icon.
-
Give the calibration a name. [1:30]
-
Enter the Chamber Inserts count.
The M2.0 model requires a new moisture calibration when using inserts. If you are going to use inserts during harvest make sure to have separate calibrations for each insert count (i.e. 0, 1, and 2 etc.). [1:47]
-
Toggle the switch to use the M2.0 Model if you are harvesting any of the following grains. [2:28]
-
Wheat, Corn, Barley, Oats, Canola/Rapeseed, or Soybeans.
-
-
Tap the green Next arrow.
-
Calibrate the chamber with test weight and then without test weight.
-
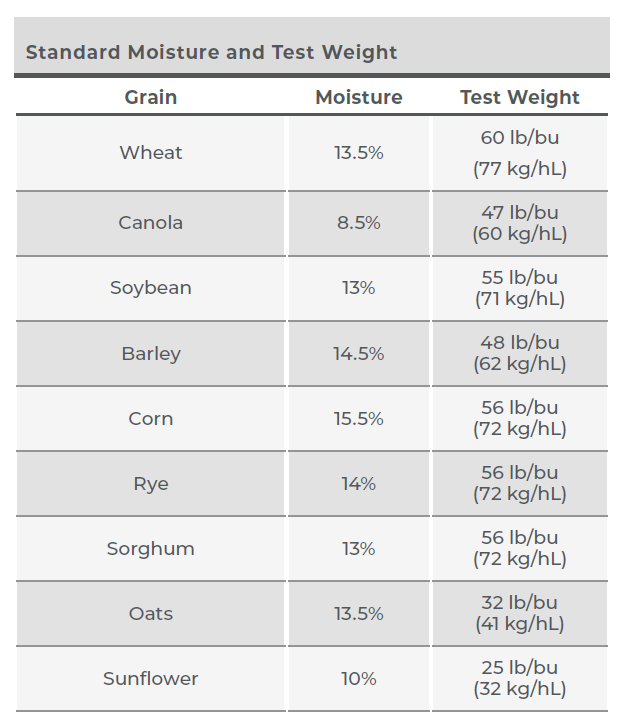
Dump the first sample and enter the Known Moisture and Test Weight. This sample should be as close to the industry moisture standard as possible. You can use the table below for reference. [3:15]
-
Dump the sample at least 3-5 times.
-
Tap the green arrow.
For the rest of the samples, only the Known Moisture is needed (test weight is not required). [4:05]
-
Cycle each sample at least 3-5 times.
There must be at least a three percent range between the lowest moisture sample and the highest moisture sample, but a ten percent range is preferred.
- Tap the green arrow to finish the calibration.
The final calibration screen shows the new values calculated for your moisture curve. [4:45]
- Tap the green check to finish.
The graphic curve displayed will show the EM calibration. If you did an M2.0 calibration, Mirus will save an EM calibration, but it will use the M2.0 calibration throughout harvest. [5:21]
- Tap the green check on the bottom right to save the new calibration.
If you need further assistance, contact the HarvestMaster Field Service Engineers. For contact information, see Contact a HarvestMaster Field Service Engineer.
- Phone Number: 435-753-1881
- Email: hmtechsupport@junipersys.com
- Address: 1132 W 1700 N, Logan, UT 84321

