Appendix C: Use the Conditional Action Plugin
The Conditional Action plugin allows users to perform custom actions at various points of the harvest process. Conditional actions are preferred to manual script modifications for the following reasons:
- Conditional actions are more apparent to a user and can be explicitly enabled and disabled without manual script modifications.
- Conditional actions are less prone to error because they can be edited with a user interface (UI) and are validated upon entering harvest.
- Conditional actions easily transfer to another computer or tablet.
- Conditional actions can be explicitly named so their functions are more obvious.
- Some behavior is only possible with a conditional action (e.g. performing actions prior to the GrainGage evacuation).
Note: You can use a conditional action to modify or intercept inter-cycle behavior of the GrainGage. In other words, you cannot perform synchronous actions after a cycle starts and before a cycle completes. If you need to execute actions within a GrainGage cycle, please contact one of the HarvestMaster Field Service Engineers.
Cycling Hierarchy
To understand conditional actions, it is helpful to understand the cycling hierarchy for a GrainGage. The graphic below demonstrates a possible plot cycling scenario.
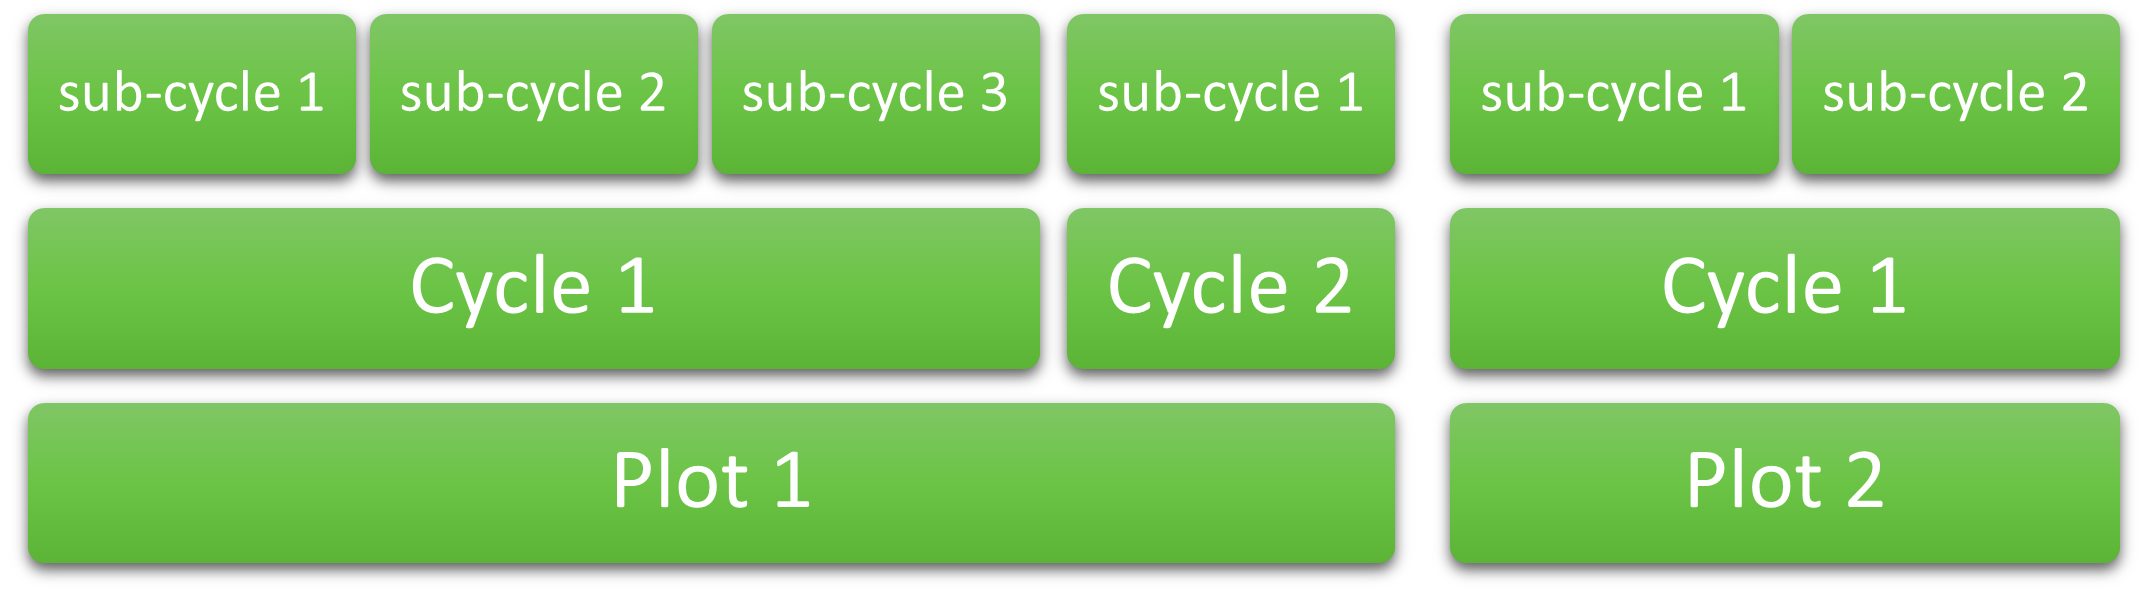
Strip Mode allows for multiple cycles per plot. Plot Mode has one cycle per plot. In the example below, Plot 1 could only occur if Strip Mode is enabled, because it has two cycles in one plot. Plot 2 could occur in both Plot and Strip Modes as it only has one cycle per plot, even though there are two sub-cycles.
Note: Sub-cycling can still occur in Plot Mode.
Create a Conditional Action
To create a conditional action,
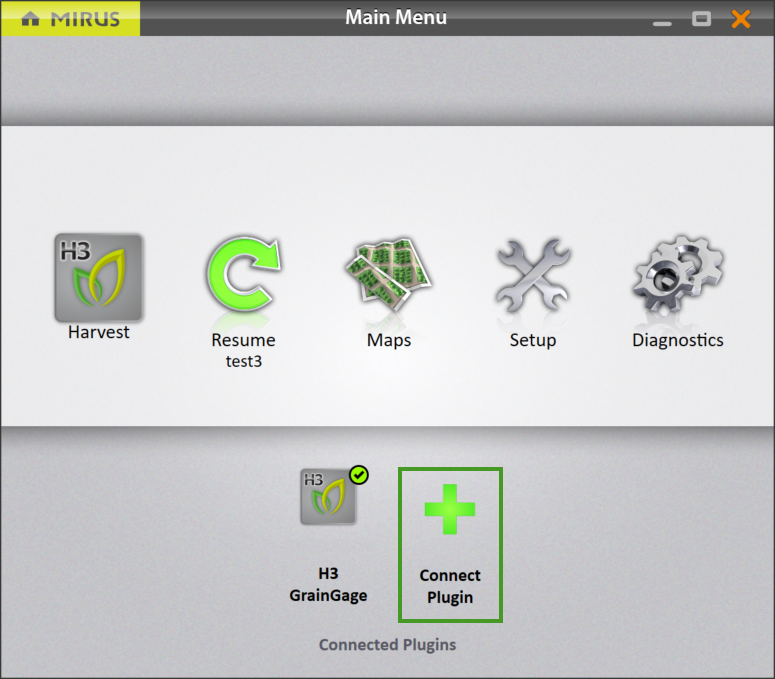
- Connect the Conditional Action plugin.
- Tap Connect Plugin.
- Under the Attachments tab, select Conditional Action.
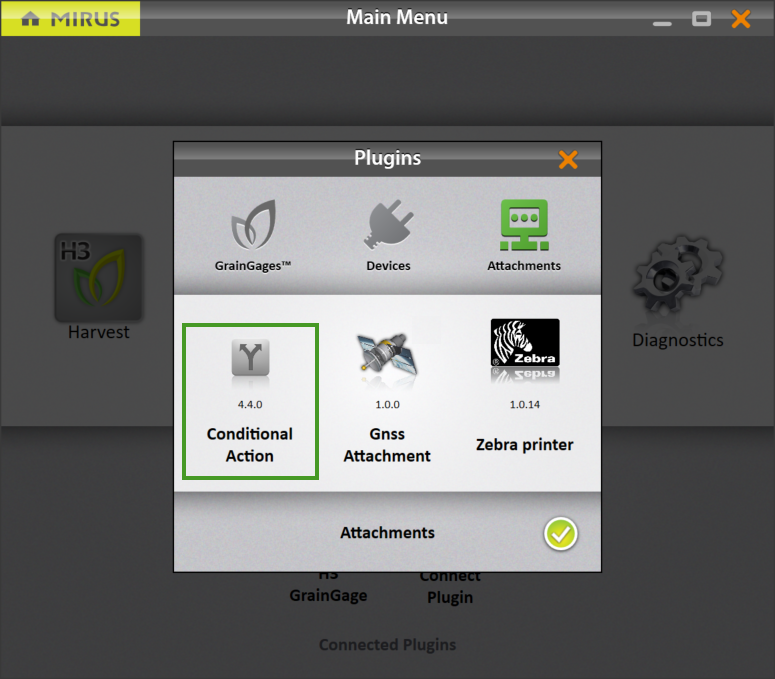
When the plugin has been selected a green check will appear in the corner.
- Tap the green check in the bottom right corner to save.
- Tap Connect Plugin.
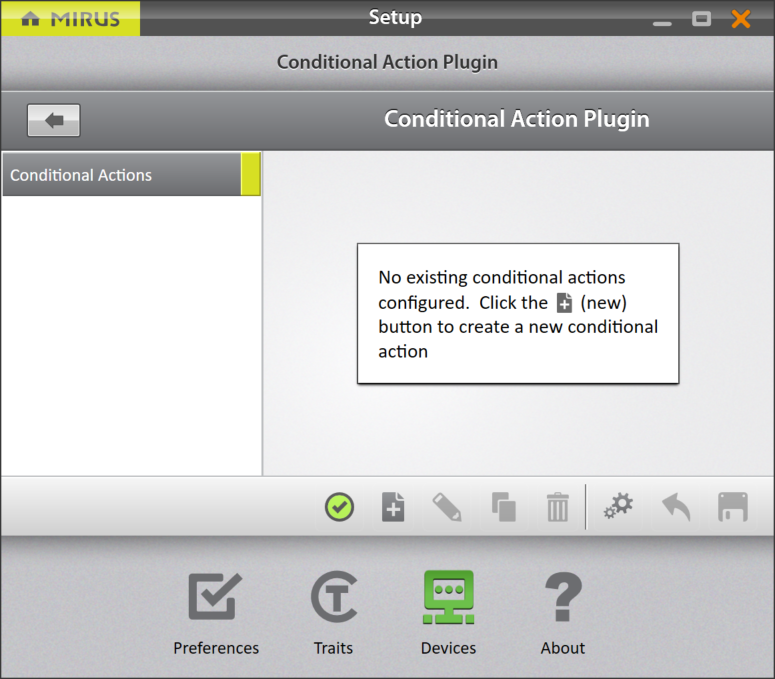
- Go to Setup > Conditional Action Plugin > Conditional Actions.
- Tap the new icon
 .
.
- Name the conditional action.
- This is also the filename that will be used when the conditional action is saved to C:\HarvestMaster\Mirus\Config\ConditionalAction\Conditions
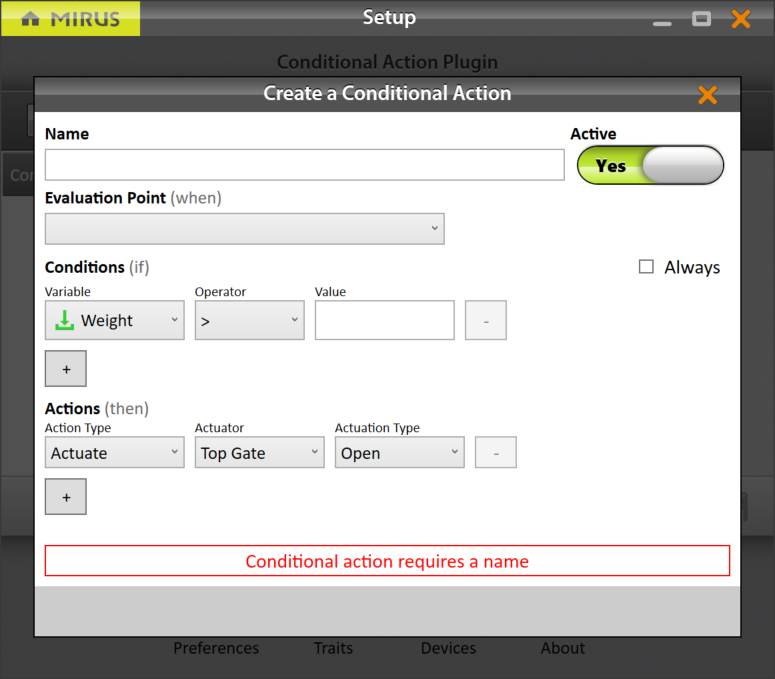
- Set the Active toggle to Yes or No.
- If set to Yes, the defined conditional action will be evaluated during harvest.
- If set to No, the conditional action will be skipped during harvest.
- Select an Evaluation Point (when) from the drop-down.
- This option allows the user to define the point at which the active conditional actions will be evaluated.
- The sequence of these evaluation points are explained in Evaluation Points.
- If you want the actions to always be performed at the specified evaluation point, check Always.
- Select the Conditions (if).
- Conditions (if) are optional conditions that control if the defined actions will be executed.
- More explanation of conditions and variables is provided in Conditions.
- Add Actions (then).
- The drop-downs include a list of actions to be performed in sequence if the conditions are met at the designated evaluation point.
- More details about actions are provided in Actions.
- Tap the green check to save the conditional action.
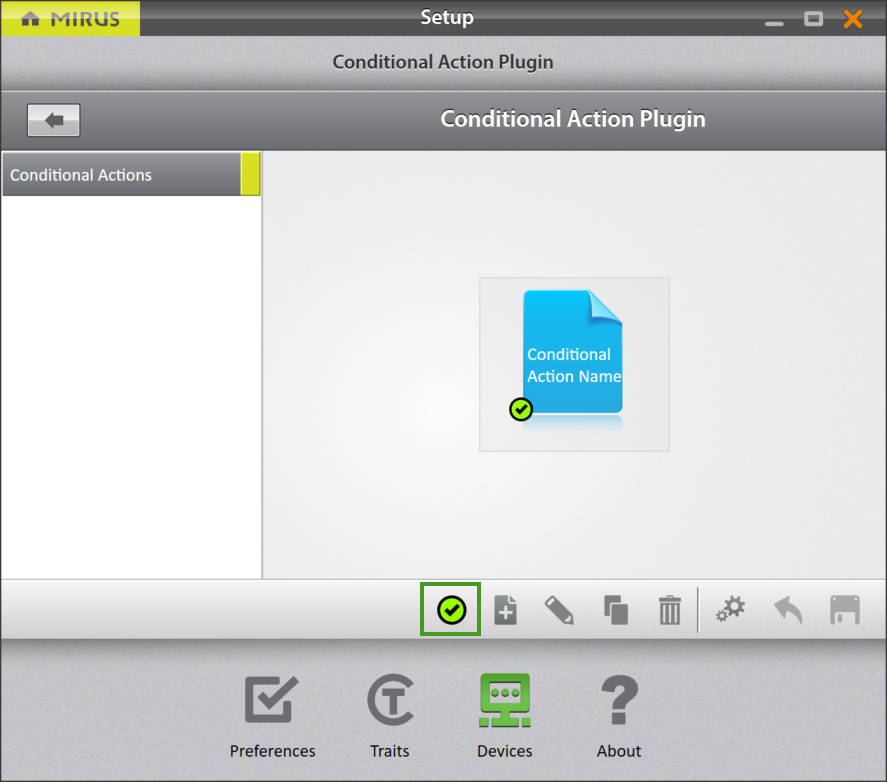

To turn the conditional action on or off, select the green check.
Evaluation Points
The designated evaluation point of a conditional action determines when, in the sequence of a cycle, a conditional action will be evaluated and executed. Evaluation points happen in sequence, which means subsequent evaluation points will not be executed until the previous evaluation point has completed.
The following table explains when an evaluation point occurs.
|
Evaluation Point (when) |
|
|---|---|
| Option | Description |
|
On ENTER Press |
Evaluation occurs when the remote enter or cycle button is clicked. If a countdown timer is enabled, it occurs as soon as the countdown timer starts. |
|
Plot is starting |
Evaluation occurs when the GrainGage is about to begin cycling a plot for the first time.
Evaluation occurs before the isolation gate closes, except in the case where the plot was started by an overflow or weight trip. In these cases, it occurs immediately after the isolation gate closes. |
|
Cycle is starting |
Evaluation occurs at the start of every cycle after a plot is started.
|
|
Before sub-cycle evac |
Evaluation occurs before the test weight chamber is evacuated. If sub-cycling is enabled, this can happen multiple times per cycle. At this point, the sub-cycle weight, moisture, and test weight data has been received. Note: If sub-cycling is enabled, use the evaluation point would be the one to use to prevent any grain from evacuating from the GrainGage. As the subsequent before cycle evac event occurs after all the previous sub-cycle evacs. Note: If only one sub-cycle is configured (default), this is functionally equivalent to the Before Cycle Evac evaluation point. Note: This is not applicable to devices that cannot sub-cycle like the HM800. |
|
Before Cycle Evac |
Evaluation occurs during a cycle before grain is evacuated from the GrainGage. Note: At this point, the cycle measurement data has been received and the weight, moisture, and/or test weight condition variables can be used to compare against cycle data values. |
|
Before Plot Evac |
Evaluation occurs before the final evacuation of grain from the GrainGage. Note: At this point, weight moisture, and test weight data is available for the plot, and conditional actions can be performed on plot totals and averages. Note: In Strip Mode, evaluation occurs after cycle of tripped cycles are completed and before the flush cycle completes. |
|
Cycle completed |
Evaluation occurs at the end of each cycle after the bottom gate and evacuation gates close.
|
|
Plot completed |
Evaluation occurs at the end of the plot after the tare check occurs and the isolation gate opens. |
Conditions
Users can also define conditions that determine if an action should or should not be performed. For example, a user may only want to collect a sub-sample if the weight for the plot is above a specified value (e.g. 5 lbs). Conditions can be defined for a few variables.
|
Conditions (if) |
|
|---|---|
|
Variable |
Moisture |
|
Weight, Moisture, Test Weight |
Weight, Moisture, and Test Weight are used to compare a context sensitive weight, moisture, and/or test weight measurement value to a specified value. These variables can only be used with the “Before [Type] Evac” and “[Type] Completed” evaluation points. This is because these are the points at which the data is available from the GrainGage. The Weight, Moisture, and Test Weight variables are context sensitive, based on the evaluation point:
|
|
ID1/ID2/ID3 |
ID1/ID2/ID3 is used to conditionally execute actions based off the plot identifier values of an imported map. If a sub-sample should only be taken for specific plots, a map could be imported that has a “1” for a plot that requires a sub-sample. A condition of if “ID1” = “1” could be assigned, so the actions to control the sub-sampler only occur on designated plots. The identifier that maps to ID1/ID2/ID3 is defined in the Graph View with the ID1/ID2/ID3 drop-down selectors. |
|
Is Flush Cycle |
The Flush Cycle is used to execute actions conditionally if the current cycle is a flush cycle. The value must be True or False. |
|
Cycle Count |
Cycle Count is used to execute conditions based on the current cycle number. |
Actions
The actions in a conditional action are the functions to be performed at an evaluation point, should the conditions be met. For example, an action would be helpful in the following scenario: an air diverter needs to be actuated at the start of a flush cycle to ensure all the grain from the cyclone has fallen into the GrainGage before closing the isolation gate.
|
Actions (then) |
|
|---|---|
|
Action Type |
Description |
|
Actuate |
Allows the user to actuate a specified actuator open or close. |
|
Delay |
Allows the user to delay the cycling sequence for a specified amount of time (in milliseconds). |