H2 or H3 Weight Calibration
Slope and Motion Calibration
Slope and motion calibration establishes the 1G voltage for the accelerometer inside the GrainGage. This calibration is critical for good weight measurements on the moving combine. It should not need to be calibrated more than once a year.
To calibrate the slope and motion,
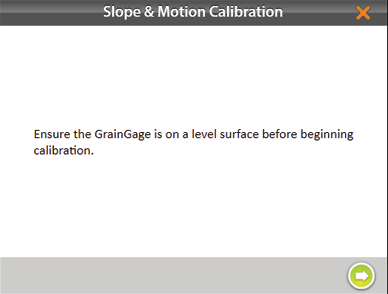
- Park the combine on a level surface.
- Shut off the engine and keep the GrainGage powered on.
- Go to Home > Setup > H2 or H3 GrainGage.
- Tap Calibration.
.png)
- Tap Slope & Motion Calibration.
- Select Open Calibration Wizard.
.png)
- Tap the next arrow
 to initiate the calibration.
- Tap the check icon
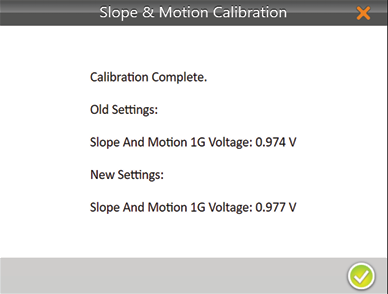
 to apply the new slope and motion settings.
Note: A typical 1G voltage should be in the range of .950 and 1.0 volts.
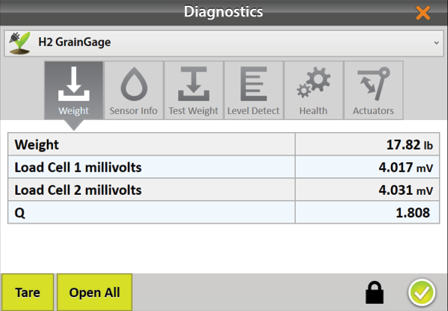
- Tap the gear icon
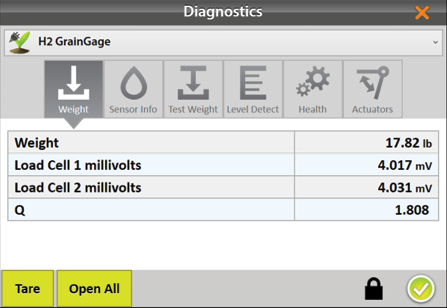
 below the calibration wizard to open Diagnostics.
 - Verify that slope and motion compensation is working and has been enabled by checking the Q value. It should be 1.000 +/- .05 with the machine running. The Q value will change depending on the machine vibration.
- Tap the check icon to close Diagnostics.
Weigh Bucket Load Cell Calibration
Weigh bucket calibration ensures the accuracy of the GrainGage’s weight calculations. This calibration should be done on initial setup and should not need to be calibrated again unless repairs are needed on the GrainGage weigh system.
Calibrate Weigh Bucket
Use the weight calibration wizard and the larger weight (11 lb (5 kg)) included with the GrainGage to calibrate the weigh bucket load cells.
To calibrate the weigh bucket,
- Park the combine on a level surface.
- Shut off the engine and keep the GrainGage powered on.
- Check that the weigh bucket is empty.
- From Home > Setup > H2 or H3 GrainGage, tap Calibration.
- Tap Calibration.
- Tap Bucket Weight Calibration.
- Select Open Calibration Wizard.
.png)
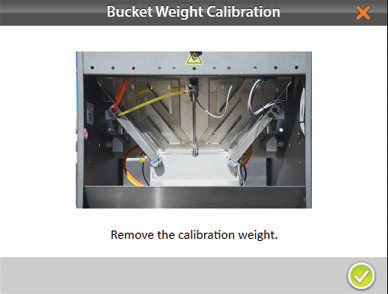
- Follow the on-screen instructions as shown below.
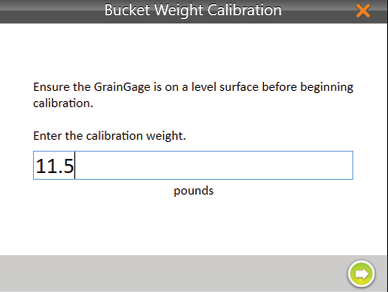
- Find the value stamped on the side of the weight.
- Enter that value in the field.
- Tap the next arrow to initiate the calibration.
- Follow the on-screen video instructions.
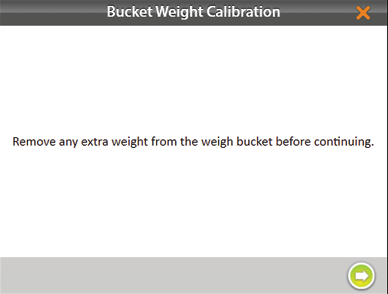
- Check for and remove any extra weight from the weigh bucket.
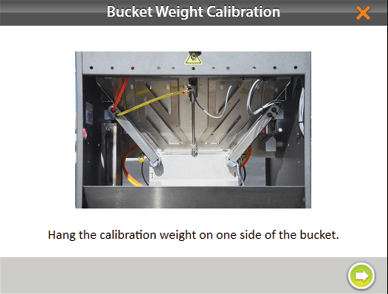
- When prompted, hang the weight as directed.
- Tap the next arrow
 .
.
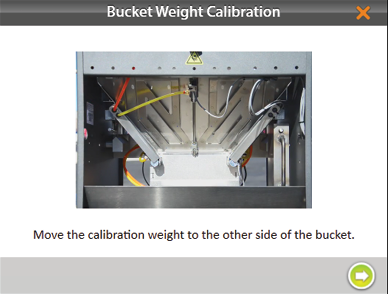
- When prompted, move and hang the weight on the other side as directed.
- Tap the next arrow .
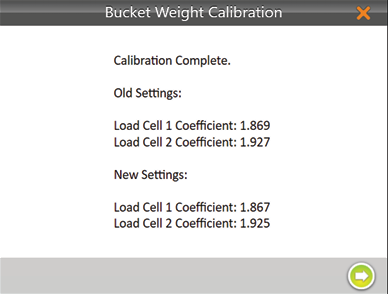
Mirus displays the old and new load cell coefficients.
Note: Typical calibration coefficients should be 1.9 +/- .2. - Tap the next arrow .
- Remove the calibration weight.
- Tap the next arrow . The system will tare and show the new calibration values.
- Tap the check icon to finish.
Check Weigh Bucket Calibration
Weigh bucket calibration is stable. It rarely changes or loses accuracy. However, because the consequences of poor calibration can be devastating to your research data, HarvestMaster highly recommends checking the weigh bucket calibration every year before the harvest season begins, as well as every day before harvest. This can be done on the Weight Diagnostics screen.
To check the weigh bucket calibration,
- After calibrating the weigh bucket, tap the gear icon
 below the calibration wizard to open Diagnostics > Weight.
 - Hang the calibration weight from each of the weight hangers.
- The Diagnostics screen should report weight readings that are very close to the value stamped on the calibration weight. If it’s not within .05 lb (23 g) when the combine and thresher are on and .02 lb (9 g) when the combine is off, HarvestMaster recommends a new weight calibration.
Note: If the weight readings continue to be off, you may have a bad load cell or something interfering with the bucket weight. - Tap the check icon
 to close the Diagnostics box.
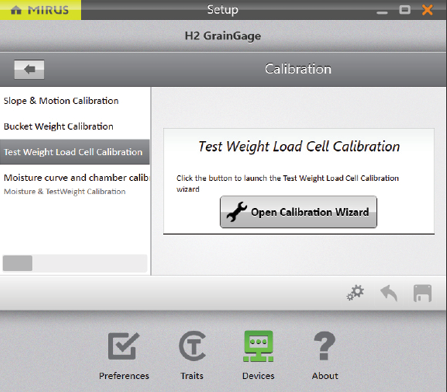
Test Weight Load Cell Calibration
Test weight load cell calibration ensures the accuracy of the GrainGage’s weight calculations. This calibration should be done on initial setup and should not need to be calibrated again unless repairs are needed on the GrainGage weigh system.
Calibrate Test Weight
Use the test weight load cell calibration wizard and the smaller calibration weight (3 lb (1.4 kg)) included with the GrainGage to calibrate the test weight chamber load cell.
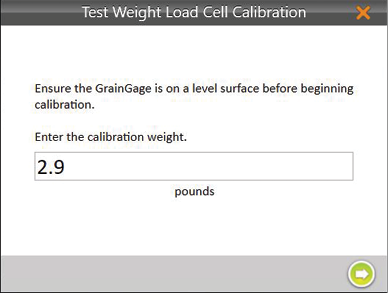
To calibrate test weight,
- Park the combine on a level surface.
- Shut off the engine. Keep the GrainGage powered on.
- Check that the test chamber is empty.
- From Home > Setup > H2 or H3 GrainGage, tap Calibration.
- Tap Test Weight Load Cell Calibration.
- Select Open Calibration Wizard.
- Follow the on-screen video instructions as shown below.
- Find the value stamped on the side of the weight.
- Enter that value in the field.
- Tap the next arrow to initiate the calibration.
- Follow the on-screen instructions.
- Check for and remove any extra weight from the weigh bucket.

- When prompted, hang the weight as directed.
- Tap the next arrow .

Mirus displays the old and new load cell coefficients.
Note: Typical load cell coefficients should be 1.9 +/- .2.
- Tap the next arrow .

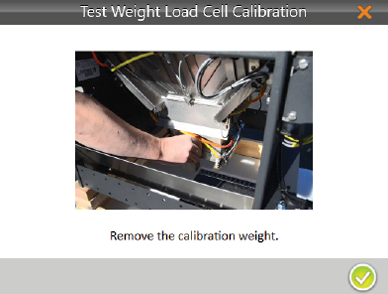
- Remove the calibration weight.
- Tap the next arrow . The system will tare and show the new calibration values.
- Tap the check icon to finish.
Check Test Weight Calibration
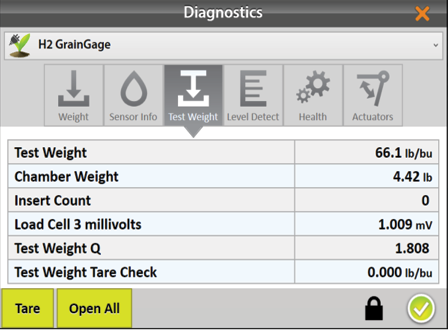
The test weight calibration is stable and rarely changes or loses accuracy. However, because the consequences of poor calibration can be devastating to your research data, HarvestMaster highly recommends checking the test weight calibration every year before the harvest season begins, as well as every day before harvest. This can be done from the Test Weight Diagnostics box.
- After calibrating the test chamber, tap the gear icon below the calibration wizard to open Diagnostics > Test Weight.
- Hang the (smaller) calibration test weight from the weight hanger on the test chamber.
- The Diagnostics box should report a reading that is very close to the value stamped on the calibration weight. If it’s not within .05 lb (23 g) when the combine and thresher are on and .02 lb (9 g) when the combine is off, HarvestMaster recommends a new weight calibration.
- Tap the check icon to close Diagnostics.
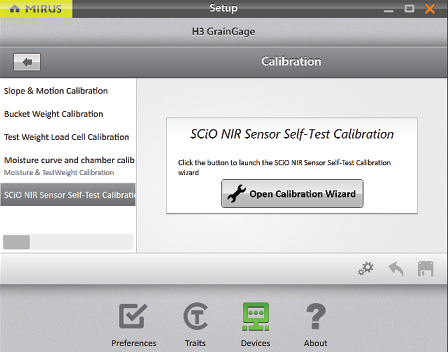
SCiO NIR Sensor Self Test
Note: This option is only available with H3 GrainGage.
To run the SCiO NIR Sensor Self Test,
- From Setup > H3 GrainGage > Calibration, tap SCiO NIR Sensor Self-Test Calibration
- Tap Open Calibration Wizard.
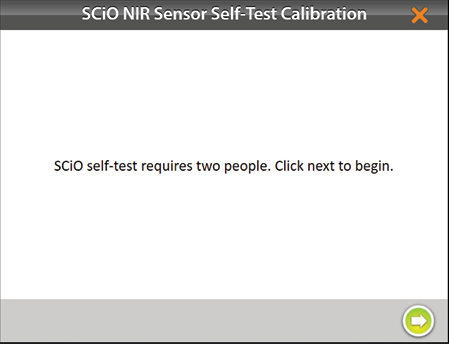
- Follow the on-screen video instructions as shown below.
- Ensure that there are two people performing the calibration.
- Tap the next arrow .
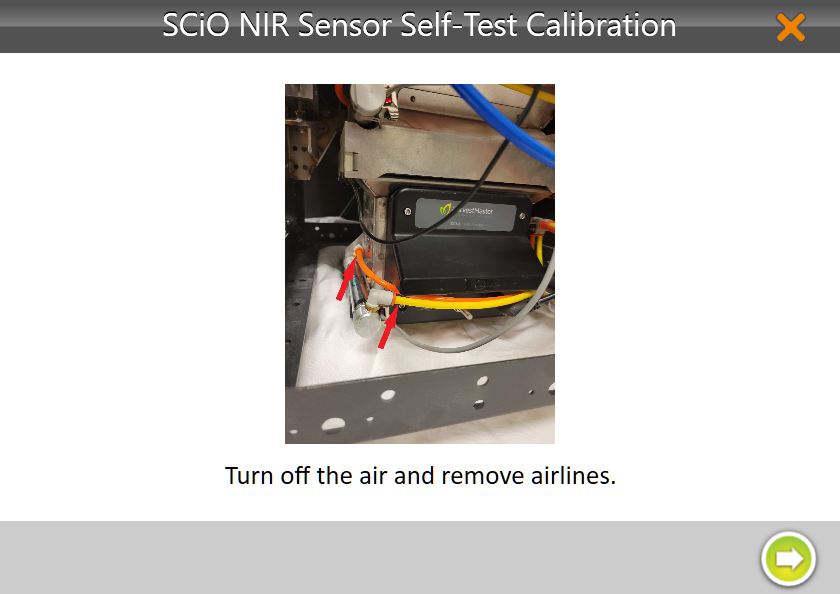
- Remove the airlines.
- Tap the next arrow .
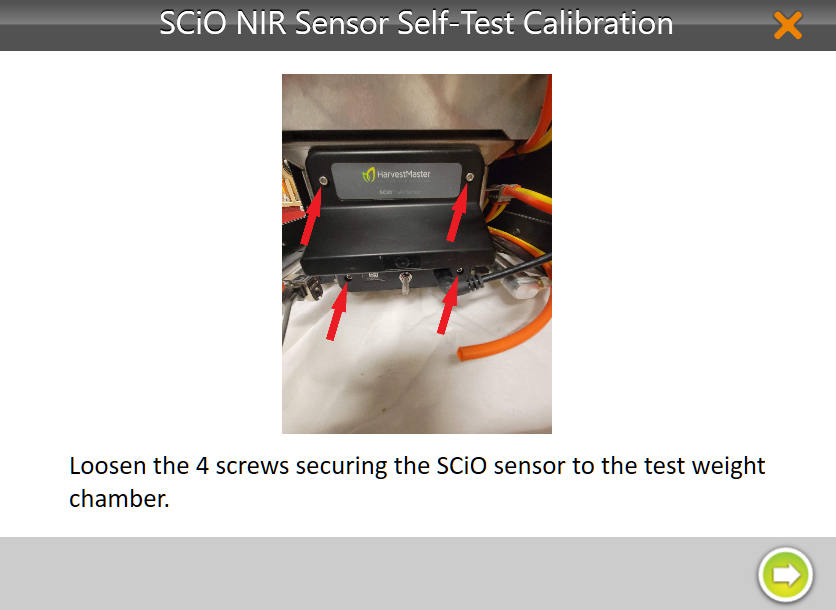
- Loosen the four screws securing the SCiO sensor to the test weight chamber.
- Tap the next arrow .
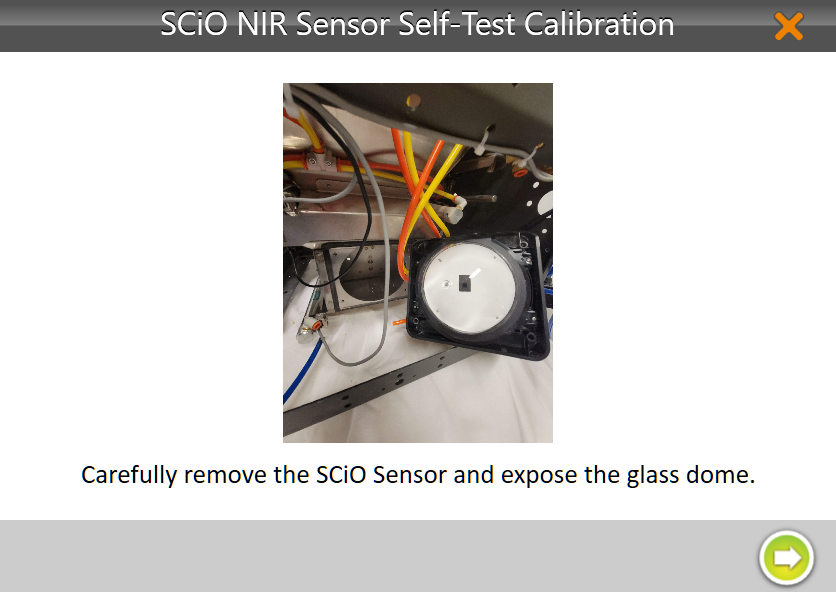
- Carefully remove the SCiO sensor and expose the glass dome.
- Tap the next arrow .
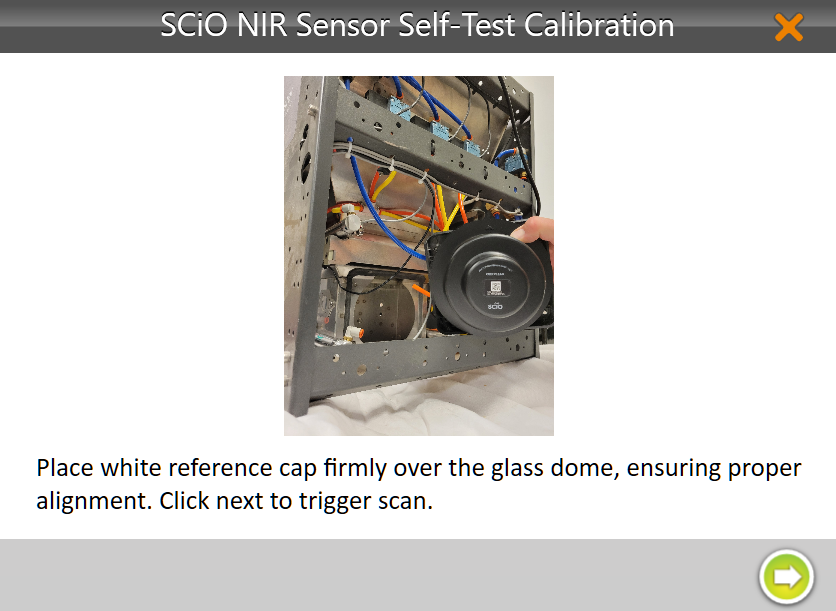
- Place the white reference cap firmly over the glass dome.
- Tap the next arrow to trigger the scan.
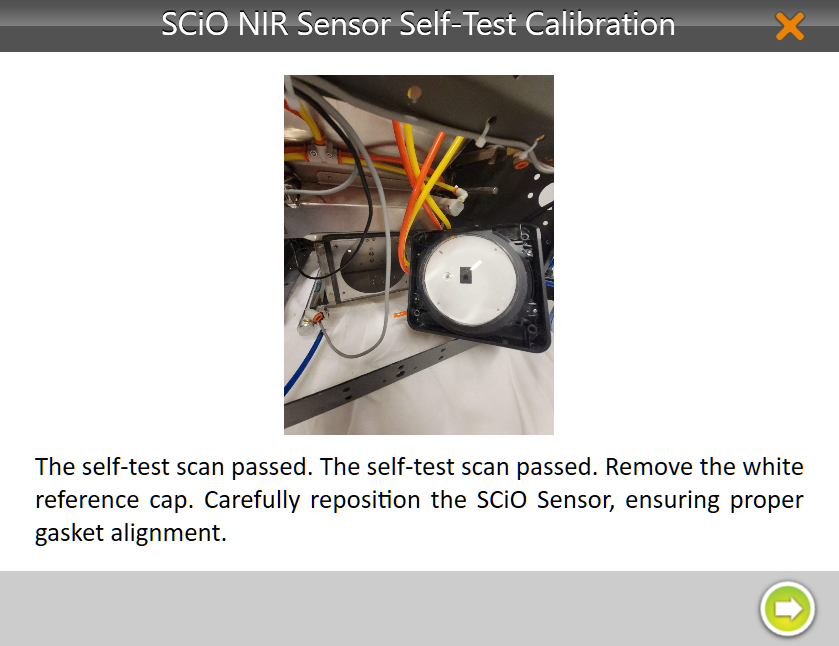
- After the scan, remove the white reference cap.
- Carefully reposition the SCiO sensor to ensure the proper gasket alignment.
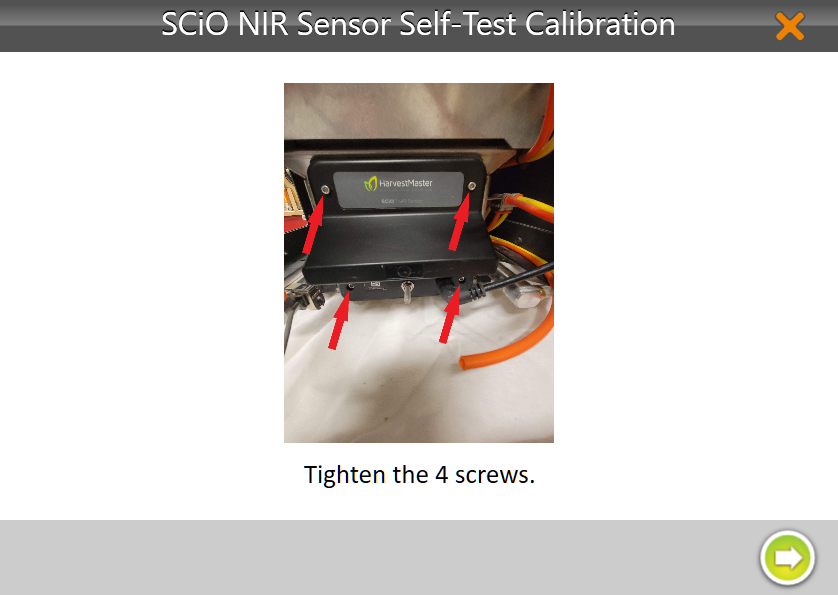
- Tighten the four screws.
- Tap the next arrow .
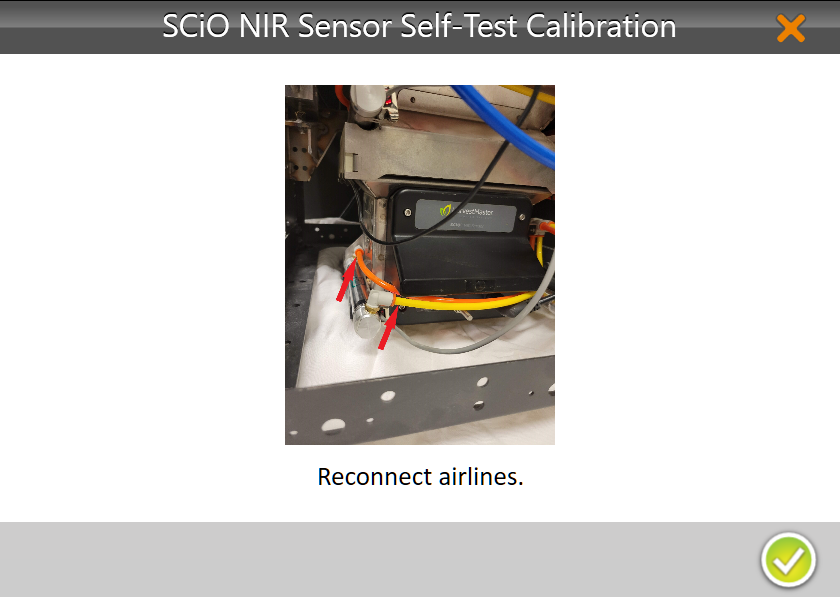
- Reconnect the airlines.
- Tap the check icon to finish.
Take the actions noted in the table below based on the result you receive from the SCiO Self Test.
|
SCiO Sensor Self Test |
|
|---|---|
|
Result |
Action |
|
The Self Test passed. |
Exit Self Test |
|
The Self Test failed. |
Power cycle the SCiO sensor. Repeat steps 1–18 two more times. Power cycling between each repeat. |
|
External light is interfering with the test. |
Move the GrainGage to a shaded environment. Repeat steps 1–18. |
|
Device temperature is low/high. |
Bring the SCiO sensor temperature to 40–120°F (5–50°C). Repeat steps 1–18. |